Log in
Why waste time?
My Account is built to streamline paperwork and cut hours of admin each week on the properties you manage. If you haven't gone paperless, don't put it off any longer.
Save time: go paperless in My Account
You'll never again have to deal with individual paper bills for each client. We'll email you convenient daily zip files containing all your clients' bills. Because no one else has login access, client details are always secure. You'll receive the eBill notification for each property registered with your agency, and the owner can view the bill through their own My Account registration.
Being registered with My Account lets you:
- create portfolios to manage groups of properties
- view individual client bills online
- access up to 3 years of payment and billing history
- update your mailing address
- easily add and remove properties
- reduce your carbon footprint with paperless bills and updates.
When you add new properties, we'll use the company name registered with your ABN, not your trading name. This ensures we're consistent when we send bills to you.
How to add the properties you manage
Register for My Account if you haven't already. Be sure to include your ABN to be directed to My Account for managing agents.
- Register the email address where you want all eBill notifications to be sent. Make sure that multiple colleagues can access it. It's your agency's My Account login.
- When registering, leave the given name blank and put your agency name in the family name field.
- At least one property must be added to activate your My Account registration.
- To add a property owned by a company, you'll need to provide their ABN. If the company doesn't have a valid ABN or only has an ACN, you can enter your agency's ABN to complete the process. Your ABN won't be saved against the property.
- Follow the step-by-step instructions below to add all the properties you manage. If you need help to bulk upload all your accounts, feel free to email ebill@sydneywater.com.au.
Step-by-step instructions
The easiest way to add a property is to have a copy of the last bill. You'll need the payment number, online ID, and the owner's family name or company name.
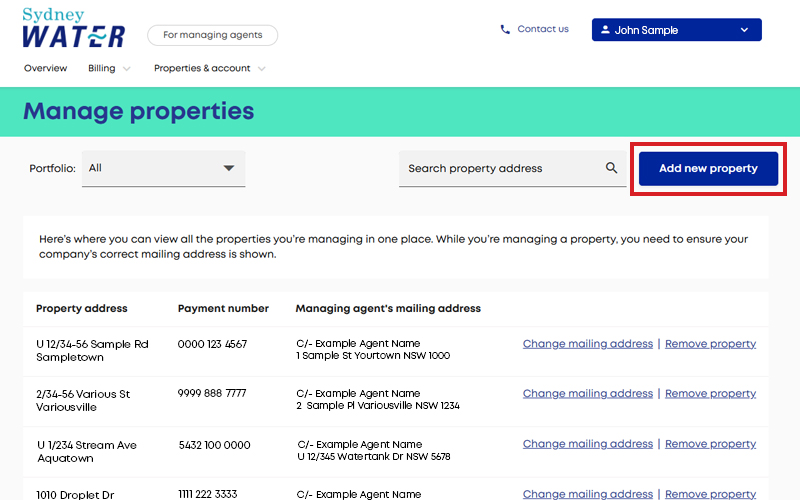
Step 1 Log into My Account and select the Manage properties tab.
Step 2 Select Add new property on the Manage properties page.
Step 3 On the Add property pop-up, select whether the owner of the property is Individual/s or An organisation. Enter the required information and select Add.
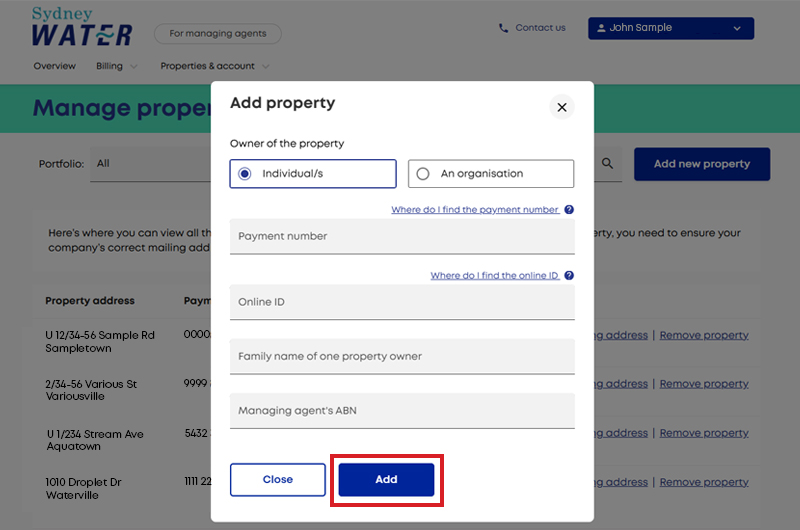
Tip: To add a property owned by a company, you need to provide an ABN. If the company doesn't have a valid ABN or only has an ACN, you can enter your agency's ABN to complete the process. Your ABN won't be saved against the property.
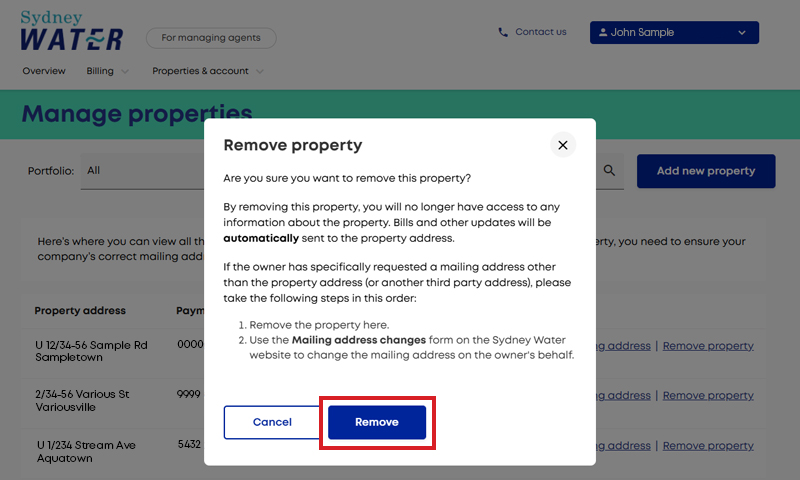
When you remove a property, the mailing address reverts to the property address. If the property management has moved to another agency, it will be automatically transferred from your My Account list when they add it to theirs.
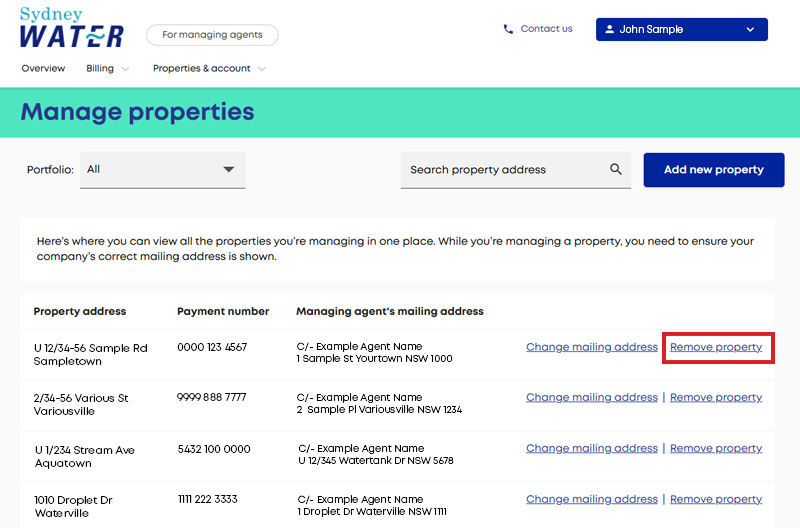
Step 1 Log in to My Account and select the Manage properties tab.
Step 2 On the Manage properties page, select Remove property next to the property you want to delete.
Step 3 On the Remove property pop-up, select Remove to delete.
Portfolios allow you to group properties within My Account. How you use your portfolios is up to you. You may want to group properties based on the individual agent who manages them. Or perhaps owners have multiple properties, and you find it easier to group them that way. Removing a property from a portfolio does not remove it from your overall My Account property listing. When you remove it from the Manage properties page in My Account, you'll also remove it from the portfolio.
Step 1 Log into My Account and select the Manage portfolios tab.
Step 2 Select Add portfolio on the Manage portfolios page.
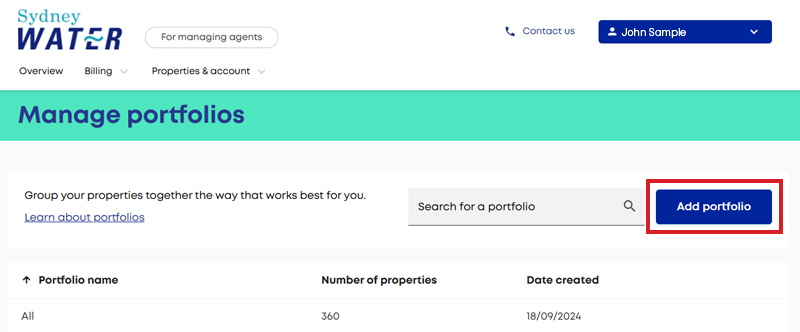
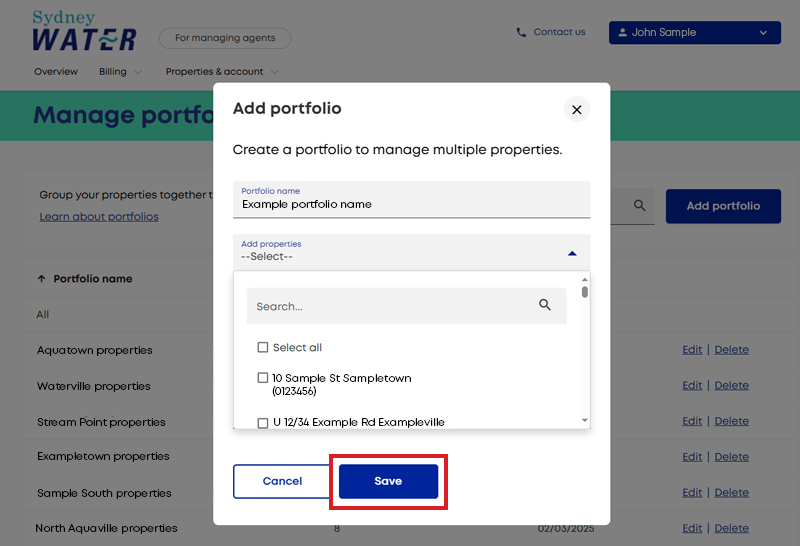
Step 3 On the Add portfolio pop-up, enter your preferred Portfolio name.
Step 4 Select the required properties from the Add properties dropdown menu.
Step 5 Select Save and the new portfolio will be displayed on the Manage portfolios page.
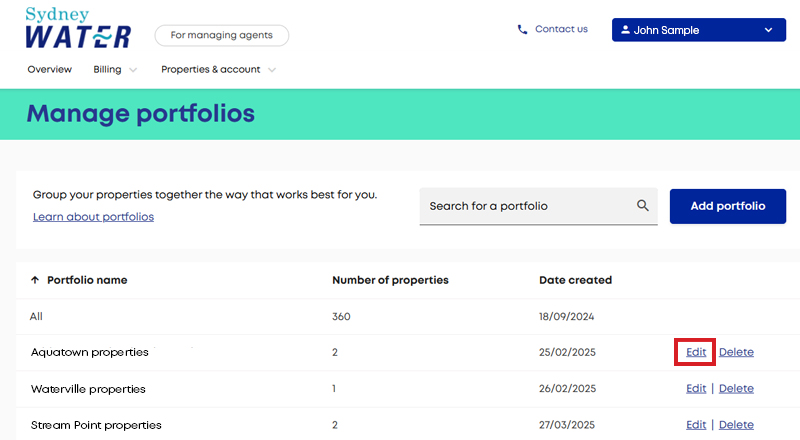
Step 1 To make changes to a portfolio, select Edit located on the right of the portfolio.
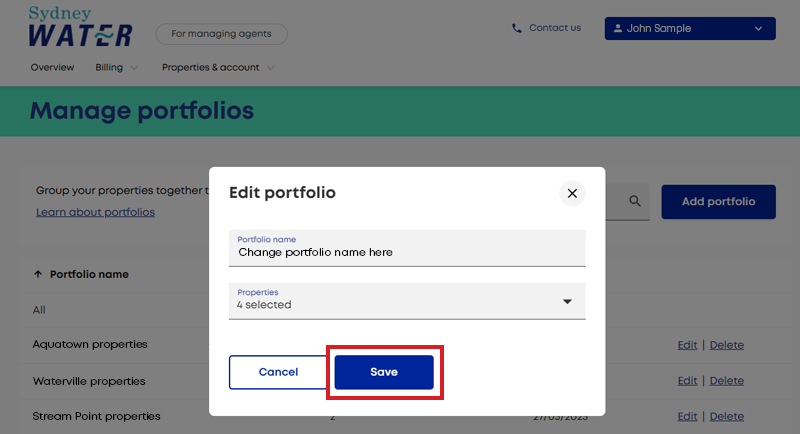
Step 2 On the Edit portfolio pop-up, change the Portfolio name or the Properties within the portfolio.
Step 3 To confirm your changes, select Save.
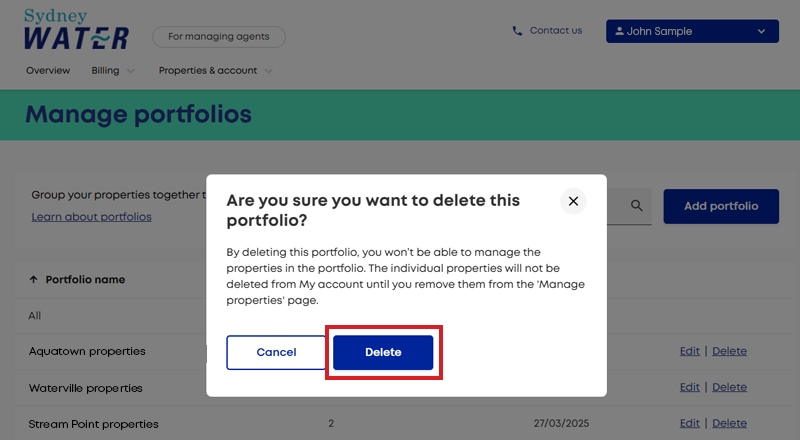
Step 1 If you want to remove a portfolio, select Delete.
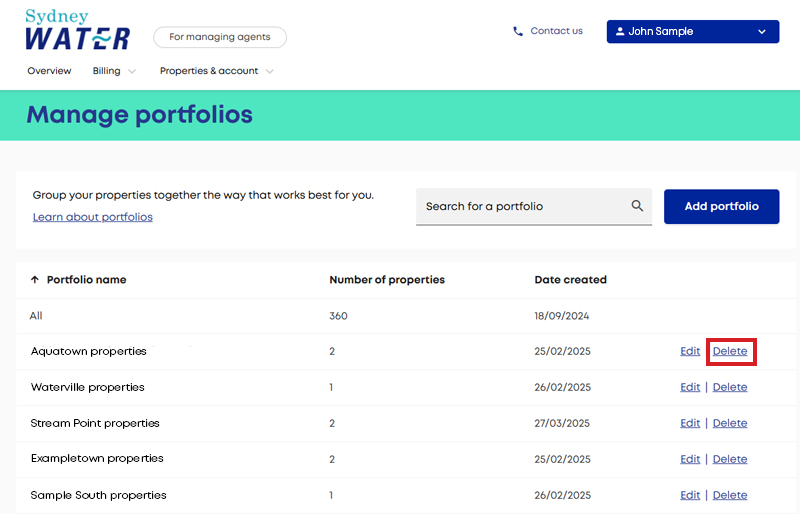
Step 2 Select Delete on the pop-up.
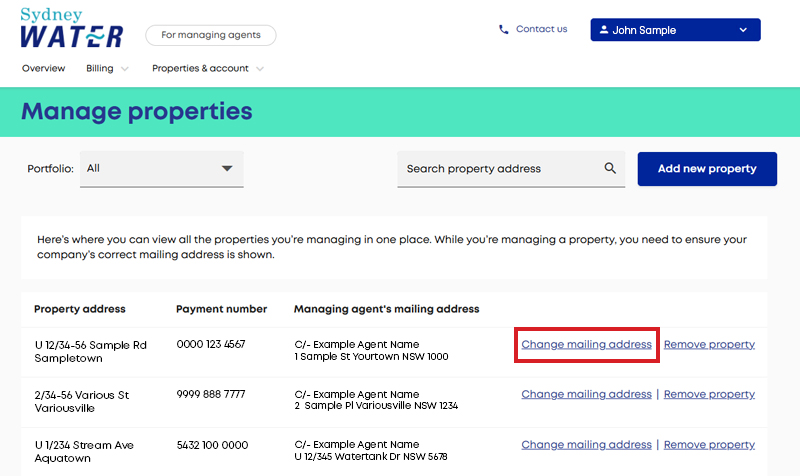
You can change the mailing address for a single property or all properties if your agency is receiving the bills on behalf of the owner. When you select a property, you can choose to update just the mailing address for that property or for all properties.
If you're still getting paper bills, you can switch all properties to paperless in one go.
Don't use this function if the bill is being sent to a property owner and not to your agency. If you add addresses not related to your agency, they'll appear in the dropdown of mailing addresses available for all properties.
Step 1 Select Change mailing address.
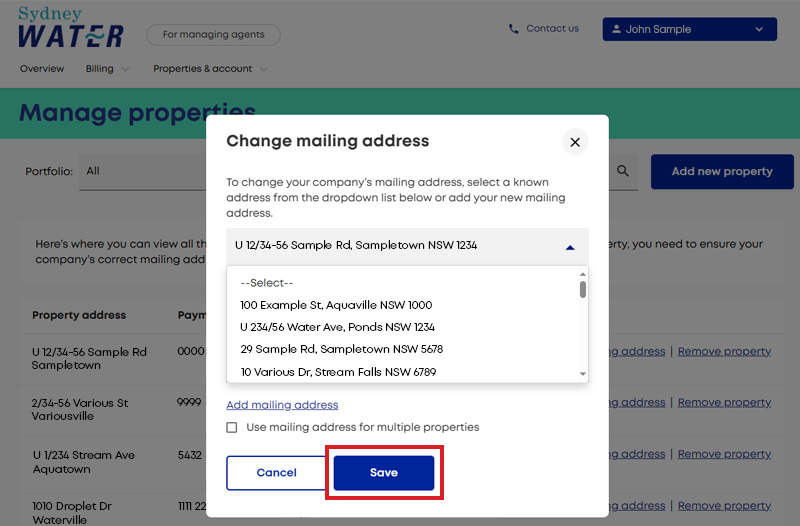
Step 2 On the Change mailing address pop-up, select an existing mailing address and Save.
Step 3 On the Your changes are underway pop-up select OK.
Tip: For bulk address changes, tick the Use mailing address for multiple properties box.
Step 1 On the Change mailing address pop-up, select Add mailing address.
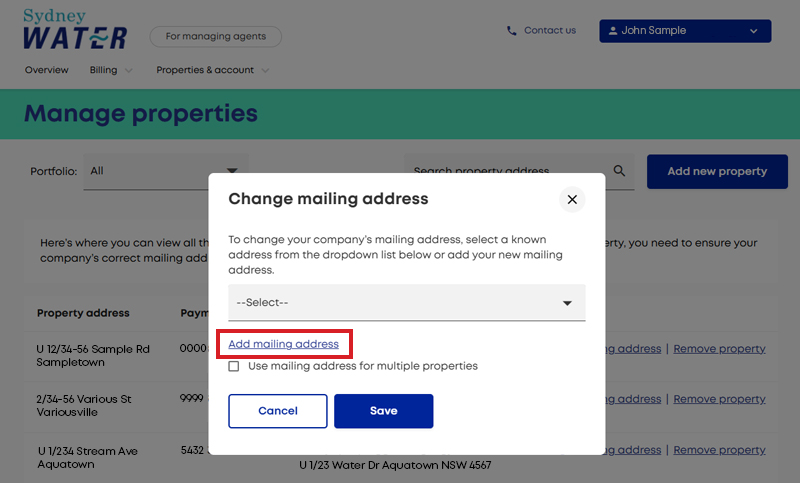
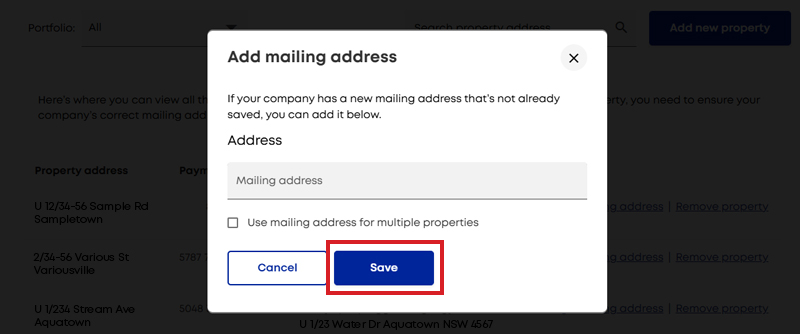
Step 2 On the Add mailing address pop-up, start typing the new mailing address and select the address from the dropdown.
Step 3 Select Save.
Tip: For bulk address changes, tick the Use mailing address for multiple properties box.
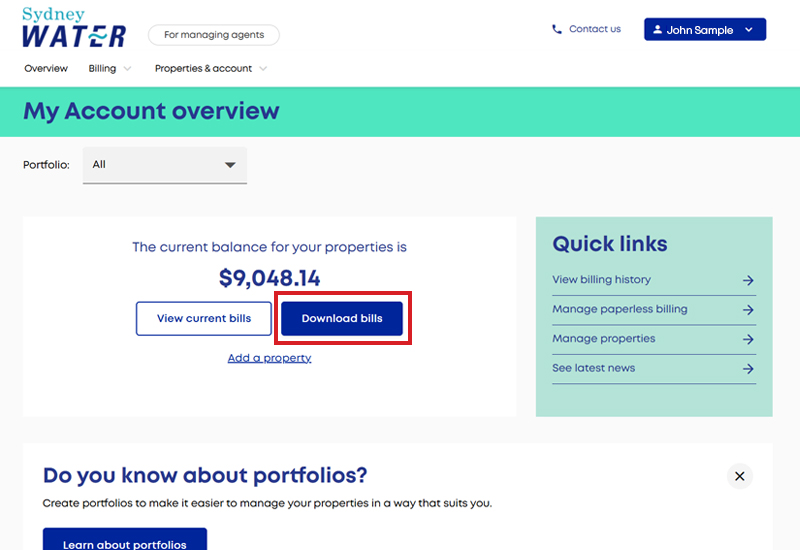
You can easily bulk download account invoices for the properties you manage as zip files. How you save them will depend on your device settings.
Step 1 On the My Account overview page, select Download bills.
Step 2 On the Download bills page, navigate to the date you need and select the arrow on the right side of the page.
Step 3 Select the link to download your zip file.
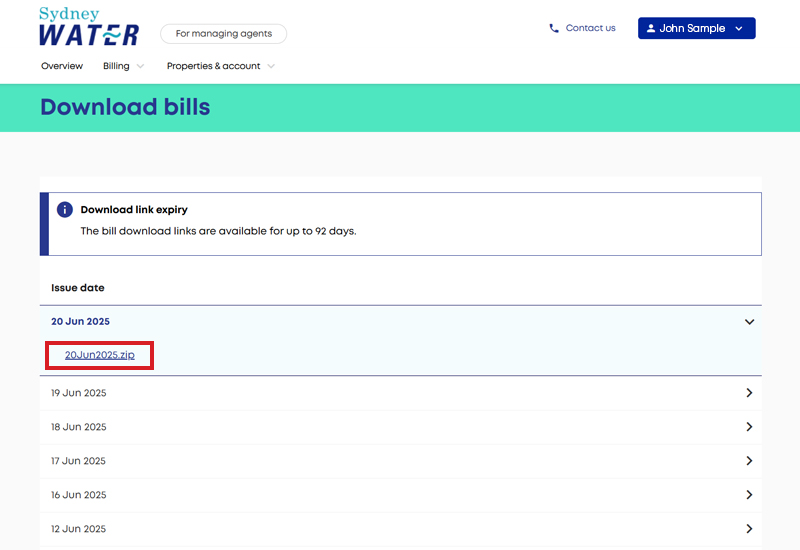
Tip: Zip files will only be available to download when there are invoices to be delivered.
- Add sender@sydneywater.com.au to your safe sender list. This is where the eBill notification will come from.
- If you're not getting the eBill notification for a property that's listed as paperless, change it to paper and then back to paperless.
- If the property has been registered for BPAY View, you won't receive an eBill notification. The person who set up BPAY View will need to cancel it so your agency can receive the eBill in future. You can check this in 'manage bill delivery' in My Account where it shows 'email being sent to another user'. If you've already done the step above, it's likely the property is registered for BPAY View.